Done. Well, there's a couple remaining items to eal with but they're trivial.
The trackball light and the coin lights need connecting, but other then that, it works.
Now i need a place to put it besides my basement. This year's project is going to have to include a man-cave I guess...
Sunday, May 22, 2011
Tuesday, May 3, 2011
Nearly there
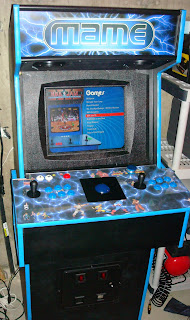
I started adding T-Moulding and finished the Control Panel.
It looks pretty nice, though still haven't put in the coin door or activated the internal lighting.
In these photos the T-Moulding isn't complete, but that's actually done...
Also, my daughter and I have started playing the last weekend. Now I come home to "lets play on the game machine" every night.
Current favorites for her (age 7) are XMen and the various trackball Golf games.
No matter how many shots it takes, she strikes a victory pose every time...
Sunday, March 27, 2011
Final Stretch
Felt like I accomplished a lot this weekend.
Updating my previous checklist:
- Monitor bezel: check. Got a real perty one specifically for 19 inch flat screens (as opposed to CRT which has an arc).
- The Monitor's Lexan plate is mounted and it's a relief. The Lexan itself is still the temporary one. When the controller is mounted and installed, the Lexan is locked into place. I have thin insulator foam to hold it in place gently. When I unlock and remove the controller - the lexan is removable and so it the bezel. This allows the monitor to be removed and reduced the weight of the whole rig.
It was totally worth the effort, because today I was able to remove everything and carry the whole rig outside alone without significant effort. - Mounted the rear panel - it's still missing a lock
- Sanded the entire thing - filled in many of the wear and tear marks with wood filler.
- Cut all of the T-Molding slots. I think the control panel is going to split when I push it in, so I'll cross my fingers.
- Cut the speaker holes and routed a control panel on top of the box (out of sight to all but me). I cut holes for the speaker volume and tone settings as well as the headphone jack and mounted it internally. Looks good and it's functional.
- Painted, painted, painted everything. The photo shows the after, but it's just the frame.
- I also painted the control panel, kick plate, speaker housing - everything. Took forever.
- Install the T-Molding
- Assemble the Control panel and hinges
- Install the speaker mount and kick-plate hinges
- Order and install the marquee and side art (contemplating a neon side window)
- Still need to test the coin door but i repainted it and cut the mount hole in the kick plate. It still needs return slot covers but I found them online.
- I Bought the SOSS hinges and they are great... But but it seems like the MDF control panel isn't going to be durable enough in the long run, so I'm going with the simple hinges for it. I also got a second pair of hinges for the kick plate, which is held in place by the control panel lock as well, but will swivel open when I need it.
- Haven't assembled the controller so I didn't install the chain yet. I'll decide on it as I go.
- I Still haven't decided where to mount the 25c buttons so they don't look odd/ Problem is I have a (presumably working) coin mechanism, so where to put the buttons. Don't want to clutter up the control panel but want them easily accessible.
- I also haven't committed to anything on the mouse buttons either, but I'm thinking I may use the 25c button to double as coin entry?
- Still need to order the marquee glass and install simple lighting. Waiting until i mount the speaker housing.
- Obviously I still have to assemble everything
Friday, March 18, 2011
Control Panel Layout
Wednesday, March 16, 2011
Yawn. Stretch. What happened?
It's been awhile I guess. Where was I?
After my last post I ran into some problems. Mostly, I didn't know how to do this, and didn't want to mess up.
I ended up taking over a full year off, and last month I started in again, with 2 weekends off for holiday travel.
It doesn't look like much because it's completely gutted. All the electronics and bells and whistles are laying safely on the bench to the left.
Here's the concessions I've made over the last few weekends:
- My cabinet is too small for the 19 inch CRT that I had. It's not "deep" enough
- I plan to move this cabinet around a few times, so I mounted my 19 inch LCD to a removable frame in the cabinet. Completely removable.
- This means no lightgun unless I get an IR version. Not bad, as i tested the light gun and it absolutely needs to be reconfigured for each game every time you start one up.
Here is a list of things I've done since the last post:
- Tested audio with new speakers (room for improvement there, but it's working)
- Cut control panel board
- Cut Lexan control panel top
- Tested and wired the MiniPac (joystick/buttons connector) including the lightup trackball and 25c buttons
- Designed and mounted a completely removable (and possibly replaceable) Controller setup. When I post some pics, I'll detail why this is so flexible.
- Cut the speaker mount (need to cut the holes)
Finally - since I'm into lists today - here's a list of things I have yet to do/solve:
- A nice bezel for around the monitor to hide the inner cabinet. I've heard people say black poster-board, and i may go that route but it feels awfully temporary and flimsy.
- Clean up the monitor's Lexan plate and particularly decide how it will interact with the controller. I've been hoping the controller panel, when raised, will allow the glass to be removed. now I think I need a glass plate to slide under the glass and when removed, the glass can slide down. I really need to get at the monitor to remove it easily, otherwise i have to come in from the back. Hmm. Maybe that's okay too.
- Test the coin door and see if it still works.
- Coin door needs covers on the coin out slots - maybe a new coin door is in order?
- Install SOSS hinges on the controller top to allow it to open
- Install slider hinge on top controller to keep it from opening too far. Actually bought one but i think it stops it from opening to 90+degrees, which I definitely want. Need it to stay opened via gravity. I want it to stop at ~100 degrees, so i may just go with the simple safety chain idea instead
- Need to decide where to mount the 25c buttons so they don't look odd
- Need to decide what to do for the mouse buttons. I want a left/right mouse button accessible but not obvious, so no mouse is necessary. I also don't want to change any default controls to use a mouse button (like P1 B1). Maybe pinball style buttons?!? That's brilliant.
- Mount the rear panel
- Sand most of the sides of the cabinet and a few of the pieces
- Cut a number of T-Molding slots
- Mount the marquee and get a marquee lighting installed
- Paint paint paint everything.
- Assemble everything
Sunday, March 22, 2009
Sunday night and I decided I can't stand to look at the coind door protrusion anymore.
I covered my exposed MOBO and lcd and started cutting and replacing.
A couple trips to Home Depot later and I have about half of the work done I need for the new front panel.
Not a great photo, but take a look. Once I mount the control panel, it'll look classic. Also, I salvaged the coind door, and since I saw it working before, there's hope that I can actually use mount it back in.
I need to fill a lot of holes and scratches next weekend, and decide what to use for paint, but... I should be good.
Also, once I add the T-Moulding, it'll be DAMNED fine looking PLAIN OLD CABINET.
I wash I could save my game right now in case I screw it up.
Saturday, March 21, 2009
Picked up the used cabinet and was slightly disappointed. I looked it up, and it is a Defender cabinet. Someone painted over the defender side art, and the controls look horrific!
No worries, as I need to replace them and customize them anyway, but it was just dirty, smelly, and I hate the shape. Since I forgot to take a photo, here's what the Defender Cabinet looks like.
Notice the odd protrusion in the front, and the high mounted coin door? Looks like a gimpy cab.
With the new cabinet as motivation, I decided to sleep on any changes. To make progress, I measured the width of the cabinet and cut some 3/4" plywood to the right size for the motherboard.
Then I mounted the old MoBo tray onto the plywood (the case was a BTX style and the cpu fan really wanted to be attached to the tray, so I cut away the parts I don't need and moounted it to the plywood.
It actually worked out as a decent tray mount, and once connected, I installed the HD, CPU, RAM, etc...
Note that I did not install a cdrom drive. I plan to usb one only if i need it, or possibly add a DVD/BlueRay later, but I doubt I'll do anything like that to this cabinet. I'll save that for my 2nd Generation Sit-down driving Xbox media center flight simulator with the Kung-Foo grips.
Oh yeah... I'm lookin ahead.
Restored the Ultracade OS and MAME partitions to the new drive and rebooted.
After some minor hardware driver updates, and the video card updates, I now can play arcade games on my plywood mounted arcade game. Whoo hoo! and Lame... all at the same time.
Finally, as a treat, I added the wireless network card, and surfed the web a little bit just to feel like I belong.
Friday, March 20, 2009
Thursday, March 19, 2009
So many pieces arrived.
Also, I found someone fairly close by selling some cabinets. $50 for a “Street Fighter like" cabinet.
Turns out the cabinet is a total SF rip-off game.The Seller tells me they were forced to kill the game due to copyright infringement. He wanted to keep the board (working) but leave me the cabinet, monitor, etc.
No problem here.
Also, Jim’s comment was, “monitor works pretty well, too.” I disagreed, said it was washed out and faded, but he assured me that after washing off the dust and tobacco, I’d be surprised.
Don’t care, as I HAVE a 19 inch monitor to use in it, and if it works, I’ll keep it for a future project. We negotiated the price long before I thought there was even a monitor at all.
BTW – Jim’s basement was an arcade cabinet and pinball heaven, and I suspect I will be contacting him more in the future.
For now, cabinet number one will likely not be as big as I’d hoped, but I think for the 19 inch monitor, it’s going to be very nice. The cabinets, after cleaning, should be pretty damned good.
Unfortunately, I never took a photo of it before I cleaned it up! Damn it.
Saturday, March 14, 2009
Starting the journal
Started the journal on March 14th, 2009. Already ordered a bunch of items.
Planning to make the cabinet by hand, but haven’t bought the MDF for the cabinet yet – Going to make the control panel first. I assume I’ll have to make it twice, so $7 worth of MDF isn’t a bad investment.
Friday, March 13, 2009
Design
Number one, I need to design my controller layout. That is easy and this is what I came up with:
Note: I will install light guns in a future add-on, so I need to at least allow for that. Fortunately, those controls are USB and can be mounted on the kick plate.
Considering flexibility, presentation, and space requirements, I consulted this great site:
I settled on the Mortal Combat style cabinet, as the control panel was already larger then average, the monitor angle appeared perfect for a CRT monitor (which I plan on using for the screen), and the cabinet has a classic look to it.
I really wanted to start off simple, possibly restoring a broken cabinet, so I put feelers out on ebay and craigs list to buy or get one, and also visited local arcades.
It dawned on me that I’d need to break the cabinet down easily when moving it, and space is a factor so I decided to build my own regardless, but kept looking for a used cabinet.
I definitely wanted a custom one for myself with the following ideals in mind:
Note: I will install light guns in a future add-on, so I need to at least allow for that. Fortunately, those controls are USB and can be mounted on the kick plate.
Considering flexibility, presentation, and space requirements, I consulted this great site:
I settled on the Mortal Combat style cabinet, as the control panel was already larger then average, the monitor angle appeared perfect for a CRT monitor (which I plan on using for the screen), and the cabinet has a classic look to it.
Click on the plans to get more details
I really wanted to start off simple, possibly restoring a broken cabinet, so I put feelers out on ebay and craigs list to buy or get one, and also visited local arcades.
It dawned on me that I’d need to break the cabinet down easily when moving it, and space is a factor so I decided to build my own regardless, but kept looking for a used cabinet.
I definitely wanted a custom one for myself with the following ideals in mind:
- Easy to dismantle
- Professional look and feel
A New Beginning…
After proving I could complete the hardware and software installation, it was time to address my shortcomings… I started the plans for my own cabinet.
I made the decision to break the completed project into phases, with an immediate goal of getting a base cabinet running and see if I could complete it to professional quality.
Phases:
I made the decision to break the completed project into phases, with an immediate goal of getting a base cabinet running and see if I could complete it to professional quality.
Phases:
- Cabinet Construction
- Hardware Installation
- Software Installation
- Graphics and Themes
Resurrection
3 days later, the cabinet was resurrected, now with fresh new innards, power supply, and all the fixins. Total cost, about $250 – and I went over the top on hardware. For the price of a new video card, this puppy can compete with any gaming rig out there, if need be.
Doomsday
In March of 2009 while visiting the shack, just before going home I booted the Ultracade to find the motherboard blown. Since Ultracade is now out of business, I looked up some alternative approaches to replacing the MOBO.
Then, the idea. I asked the owner how aggressive he’d like me to get in getting the cabinet working again.
I got all green lights, and proceeded to gut the machine, and took home the controller and motherboard.
Initial Concept
I always had this dream of buying my own arcade cabinet. I was a child of the 80’s and further, lived for a few years within walking distance of 4 huge arcades. Needless to say, I was addicted at an early age.
A few years ago, while visiting a friend’s ski-shack I found that he’d purchased an Ultracade Arcade system. I was disappointed in the selection of games, but it sparked an idea that has now taken off.
In researching emulators, I found MAME and some decent front-ends for emulation and decided to implement my own MAME PC.
Subscribe to:
Posts (Atom)